

Saturn Linux is a Java based Guru application that operates the Cassini tester via the USB RIFL Master connection.
The Cassini application with ArcaOS Desktop is used to access features not yet available with Saturn. When deployed on Linux, Cassini in Container can be used in parallel with a procedure for reliably switching between Saturn Linux and Cassini in Container. Do not modify the settings of the ArcaOS Desktop guest container, instead follow instructions to modify EPC settings in ArcaOS, instead use the Linux EPC steps.
See also:
Test Session Def User Guide (https://roos.com/docs/ECHN-CC7SHU?Open)
RI8608 Linux NUC Admin Guide https://roos.com/docs/RBEH-DFTNQE
This document is divided into 3 sections: Saturn Linux Setup, Using Saturn Linux and Using Cassini in Container.
Saturn Linux Setup Procedures:
- Latest Updates & Known Issues
- To Setup Linux EPC Guru ID and RiTesterDef
- To Update Saturn via .GZP
- To Update Guru
- To Revert Saturn App to a Previous Version
- To Setup a New Win10 User
- To Setup Python3 For Saving Results as CSV
- Workaround To Validate Fixture is Activated vs 'unknown node'
- To Backup for Disaster Recovery
Latest Saturn Updates:
- SaturnUpdate 20250129.gzp - Saturn v59 released Jan 29 2025 and has some known limitations listed in the Saturn Linux Issue Tracker link below.
- Known issues documented on Saturn Linux Issue Tracker with workaround details and fix priority.
Linux EPC Configuration
- Default username/password is "Cassini" and "Cassini16"
- Guru should be configured to match the GuruID of the Tester following the steps below (vs Cassini steps).
- Saturn Tester name is manually configured to match the GuruID of the RiTesterDef loaded by the Cassini app. If a Tester Name change is performed, Saturn must be manually updated to reflect the active tester name to avoid confusion.
- Open ~/Documents/admin.txt to identify assigned GuruKeys
/* mount <CompanyName>GuruKeys.vfd to /media/floppy
* then unzip the gurukeys
* sudo unzip -o /media/floppy/GURUKEYS/<GuruID> -d /media/floppy/
*/ - Open a terminal window and enter:
sudo mount -t vfat -o loop ~/Downloads/<ID>GuruKeys.vfd /media/floppy -o gid=disk <ENTER>
sudo unzip -o /media/floppy/GURUKEYS/<GuruID> -d /media/floppy/ <ENTER> - Open Files app and navigate to ~/RiApps/GuruApps/GF10RD2A/bootCassini.txt, then edit with Mousepad
- Replace '<TESTER NAME>' with the expected RiTesterDef's Title on the line (under :ACTIONS, line 22)
sync,topic=admin/app,omap=^runLocal+channel=rtalk+className=rtalk.SmPortalForRtalk+rtLoad=GAKRE8CABJADXV00+rtLaunch=RiRemoteViewModels:register+tester=<TESTER NAME>
- Close Saturn window if it is currently running by clicking the close icon (red X in the upper right corner) and choose Yes when asked "Exit main application?" from a Confirm prompt, as shown in Figure 2.1.
- Choose Logon from Guru and enter valid Guru user credentials.
- Choose Apps > Guru Browser to Launch Guru Browser.
- Choose Guru Import List tab.
- Choose Get Import File(s), navigate with Look In drop down menu to locate the .GZP and choose Import to add it to the Guru Zip Files to Import list shown in Figure 2.1.
- Choose Import to upload the contents of the update into Guru and then Close Guru Browser.
- (Optional) Follow specific update/distribution instructions that accompany package.
For Major Updates Only: Remove the Saturn system cache folder in the "~\RiApps\GuruApps\GF10RE2A\tmp" directory, as shown in Figure 1.
Worksheet to CSV Python Script: Modify RITdb2csv.py from to the Saturn application folder (~\RiApps\GuruApps\GF10RE2A\), run manually as needed.
STDF Output Directory: edit "~\RiApps\GuruApps\GF10RE2A\bootCassini.txt" file; under :ACTIONS; line with "RtalkDatalogCache", after "+stdfDir=~\RiApps\data" then close and restart Saturn. (See Figure 9.13), - Choose Apps to confirm an updated version number should appear Saturn Linux v##, as shown in Figure 3 and then choose Saturn to launch the application.
To Update Guru:
- Guru can be upgraded by copying "guruServer.zip" and (occasionally) "startApp.bat" to the ~\RiApps\guruServer directory.
- Choose Yes when prompted to replace the files in the destination directory, as shown in Figure 2.2.
- Confirm the file dates match those from the update media, as shown in Figure 2.3.
- Restart Linux OS by choosing Apps Icon > Restart, as shown in Figure 2.4.
- After the OS starts, login with user and wait up to 2 mintues for Guru to launch, DbManager to start, and then Saturn App and "Tester loaded" appears in the Saturn message window.
- Confirm Guru version by hovering over the Guru Server icon on the taskbar, as shown in Figure 2.5.
To Temporarily Revert Saturn App to a Previous Version (Urgent Use Only):
- First, notify support@roos.com immediately to open an issue request to fix the root cause.
- Choose Logon from Guru and enter valid Guru user credentials.
- Choose Apps > Guru Browser to Launch Guru Browser.
- Choose RiApplication from the pull down menu below Key1 : ri.sys.ObjClass.
- Choose the row with Saturn (or any other App) under ri.sys.Title column to select the object.
- Choose Revision History tab along the bottom.
- Identify the previous version either by date or version column (note: does may not align with the version that appears in the apps button), select it from the rows above and choose Make LastRevisionOf from the right mouse button menu.
- A new revision appears with the current date, this is what will be launched from the Apps menu because it is now the "latest revision" and Guru Apps always load the latest revision.
- From a Windows admin desktop, open a cmd prompt and type the following (replace <IP ADDRESS> with the Linux EPC IP Address or host name)
ssh cassini@<IP ADDRESS> -L 5900:localhost:5900 "x11vnc -no6 -localhost -usepw -auth /var/run/lightdm/root/:0 -display :0 - Open your preferred VNC client and connect with localhost:5900.
- Close the cmd window to terminate the temporary remote admin session.
NOTE: To use RDP, the currently running desktop user must log out first. See also "To Autostart VNC Server at Boot."
To Backup Linux for Disaster Recovery:
- Use any bootable Disk Image Tool (like Clonezilla) to create complete block level backup.
NOTE: It is safe to restore and use this image unlike with the RI8574 ArcaOS EPC TIMs, which stored unique calibration data for the embedded 10 MHz reference clock on the drive. - Use an automated backup solution (Timeshift, Duplicati, rsync) to backup the following directories:
- Backup the home directory that contains ~/RiApps (programs), ~/RiGuru (data)
~/RiGuruArchive (local data redundancy can be skipped) - ~/Documents/Cassini16.ova - Backup copy of the Cassini 16 Container and its setup files. Used to restore the factory default state of the container.
See Also:
Screen Resolution with VirtualBox (Cassini Virtual Workstation & Cassini in ArcaOS Container) https://roos.com/docs/RBEH-A9CPVP
Using Saturn Linux Procedures:
- To Launch a Test Exec (RiTestSessionDef)
- To Open a Testplan (change most settings & limits, Compile & Run)
- To View the Worksheet and Save CSV from Saturn Testplan
- To Save CSV from the Testplan Run Results Worksheet
- To Change Limits with Saturn Testplan
- To Modify Instrument Settings from Testplan
- To Calibrate with Cal Exec
- To Save CSV from Cal Results
- Change Device Interface with tester browse > check
To Open a Test Exec (RiTestSessionDef): (compile and run)
- Saturn is launched with Guru after a network connection is detected, wait for the message window show "Tester loaded", as shown in Figure 4.
If the compile fails, follow "To Validate Fixture is Activated vs unknown node:" steps above. - From the Saturn launch window, choose apps > cassini and double click on test exec, as shown in Figure 9.1, to open the Exec user interface.
- Select the Test Exec (RiTestSessionDef) by title, then choose on the select and Saturn will compile the testplan. (See Figure 9.2 and 9.3)
- From the RI Testexec window, enter Lot, Data Code, choose a Device from the list (Figure 9.3), enter Comment and DIB ID. as shown in Figure 9.4.
- Press Start, the worksheet will open and the Stop, Test and Retest buttons will be enabled. The Lot, Date Code, Device, Comment and DIB ID fields are disabled and can not be modified until Stop is pressed. The PartID, Result, Hardbin and Softbin values for the last tested DUT is displayed, as well as update the Total and Passed counts for the lot. (See Figure 9.6)
- The testplan runs and records the data with the current PartID value, the Retest button will run the testplan and use the current PartID. (See Figure 9.7, Figures 9.9 and 9.10) Or the user can modify the Next part field then choose Test, as shown in Figure 9.8. For example, the next part id is "21" or accept the automatically incremented part id.
- Choose Stop button to end the lot, output STDF file in the STDF Directory (defaults ~\RiApps\data) with the file name of <Lot id>_<lot-end time>.stdf, as shown in Figure 9.11, and the .rtidb stored in the Saturn app Cache directory (~\RiApps\GuruApps\GF10RE2A\tmp\dataCache).
- Notice the Start button is now green, and the user input fields are enabled (do not have to re-compile the testplan). Repeat the 4 steps above with the next lot using the same Exec or close when complete.
- Saturn is launched at Guru startup. If not, choose Apps > Saturn v## to launch the Saturn system software and wait for the message window show "Tester loaded", as shown in Figure 4.
If the compile fails, follow "To Validate Fixture is Activated vs unknown node:" steps above - From the Saturn window, choose apps > cassini and double click on testplan, as shown in Figure 10, to open the Testplan viewer.
- From the Testplan viewer window, click on Testplan > Load, then select a testplan to open from the list and choose select, as shown in Figure 11.
- Select a testplan limit, click on Testplan > Limits, then choose a limit file and press select, as shown in Figure 12.
- Choose compile button and monitor Saturn message window while the progress bar completes. The compile button background turns green when finished. If the compile button is red, resolve any errors before repeating this step.
- Compile the testplan and wait for the Saturn message window shows "End Timing" and the "Run" button turn green, as shown in Figure 15.
If the compile fails, follow "To Validate Fixture is Activated vs unknown node:" steps above. - Choose run to start testing DUTs.
To View the Worksheet from testplan and Save Csv:
- Open the testplan results worksheet, click on Testplan > Results, as shown in Figure 13, the worksheet window will open as shown in Figure 14.
- Click on the "Run", the results will show in the worksheet automatically, as shown in Figure 16.
- (Optional) Choose Data > Save Csv to convert the RITdb.datalog is always saved to Guru data in the worksheet to a .csv file in the ~\RiApps\data directory. (See Figure 9.14 and 9.15)
To Change Testplan Limits:
- From the testplan viewer with the limits file selected, choose change limits from the right click menu on a data save button, as shown in Figure 17.
- This will open the Edit Limits window, if the data save is a sweep result, it will appear in a table, otherwise its just one entry in the table.
- Click on any value to change the entry then press Enter key.
- After all changes are done click on Accept to store the limits, as shown in Figure 18.
Note: this does not save the testplan. - Choose compile and run, the new limits and the result will be shown in the worksheet, as shown in Figure 20.
- Limits will be saved after following To Save a Testplan steps.
To Copy Limits from Another Testplan:
- After following the steps to Import .GZP with Guru Browser and To Open a Testplan, limits from another testplan can be imported to save time. All the current limits will be replaced and no confirmation will be asked.
- From the tesptlan viewer of the newly imported testplan, choose Testplan > Copy Limits, as shown in Figure 21.1
- Choose the Testplan name from the Select Testplan prompt and choose select, as shown in Figure 21.2. All of the limits of the current testplan will be replaced by the selected testplan. Be mindful of missing limits for any new or different test panels between the current testplan and the selected one.
- Follow steps To Change Testplan Limits to apply to any new/different test results.
- Choose compile and run to confirm limits on the Worksheet.
- Limits will be saved only after following steps To Save a Testplan.
To Modify Instrument Settings from testplan:
- Left click on any instrument state buttons to open an Input window.
- Enter a new value and choose OK, as shown in Figure 22.
- Choose compile and run, as show in Figure 23.
- Notice on the worksheet, it will update to show the Vcc3 is sweep from 0 to 2.0, as shown in Figure 24.
Note: the Instrument Setting changes are only in the memory and has not yet been saved. Follow the steps To Save Testplan to make the changes persistent.
To Save a Testplan:
- Chose Testplan > Save, as shown in Figure 25. to open the Save Testplan window, as shown in Figure 26 where all attributes are listed, with the Title value on the bottom and Save and SaveAs buttons. (Requires update 20220805 or later.)
- Optionally, edit any guru attribute by selecting the attribute and choose Edit Value, then type a new attribute value, as shown in Figure 27.
(i.e. change ri.sys.Device attribute to be a different Device) - Choose either the Save button to save the testplan with the same Title adding to the Revision History, or choose SaveAs to create a new copy of the testplan with a unique Title, e.g. you will be able to see both tesplans as shown in Figure 26.
- In Figure 28, it shows the new testplan that we have just saved in the testplan selection.
- From the Saturn launch window, choose apps > cassini and double click on cal exec to open the Cal Exec user interface.
- Choose Actions > Open List and choose the Cal List.
- Choose Actions > Load Cal Kit and choose the appropriate entry. RiCalKit naming convention sets the date as the last valid cal date and should be checked if in the past. The Cal Kit contains the Open Coefficients and Noise Source ENR table and should be valid.
- Choose Actions > Calibration List and select the appropriate entry (likely "Acme Rev A")
- Select pairs of testplans Cal/Validate by holding the CTL key and left clicking on each testplan name and choose Run Selected from the right mouse button menu.
- Follow the user prompts. These often require connecting PKZ#12 adapters to either a Power Sensor, SMA cable, and OSL standards. (See Figure 1 and Figure 2)
IMPORTANT: ALWAYS follow good RF connector hygiene and use a SMA Torque wrench when tightening and avoid rotating the inner cable, ALWAYS rotate the outer nut. - Repeat until the list is completed. Cal data is ONLY saved after every successful validate. If a validate fails, repeat all selected Cal plans.
- From the Saturn launch window, choose apps > cassini and double click on cal exec to open the Cal Exec user interface.
- Choose Actions > Open List and choose the Cal List.
- (Optional) Choose File > Load Cal Kit and choose the appropriate entry. RiCalKit naming convention sets the date as the last valid cal date and should be checked if in the past. The Cal Kit contains the Open Coefficients and Noise Source ENR table and should be valid.
- Choose File > Fixture Cal
- Follow the user prompts. These often require connecting PKZ#12 adapters to either a Power Sensor, SMA cable, and OSL standards. (See Figure 1 and Figure 2)
IMPORTANT: ALWAYS follow good RF connector hygiene and use a SMA Torque wrench when tightening and avoid rotating the inner cable, ALWAYS rotate the outer nut. - Repeat until the list is completed. Cal data is ONLY saved after every successful validate. If a validate fails, repeat all selected Cal plans.
To Save CSV from the Cal Results:
- From the Cal List window, choose Actions > Results.
- From the Worksheet, choose Data > Save Csv to convert the data in the worksheet to a .csv file in the ~\RiApps\data directory.
To Change Dut Interface with tester browse > check
- From the Saturn launch window, choose apps > cassini and double click on tester browse to open the Configuration window.
- Remove or Attach the Device Interface and press the check after each action.
- Choose check button and notice the Dut Interface instrument (cal data) being listed in the Configuration window. Press check once after physically removing the DIB to deactivate the DutInterface from the configuration and check again after it is attached to activate it in the configuration.
- From the Saturn launch window, choose apps > cassini and double click on tester browse to open the Configuration window.
- Attach the Device Interface with a new ESN.
- Choose check button to read the unrecognized ESN.
- Choose Tester > Add Dib Def menu and choose the appropriate definition Title from the list and choose select.
- Select the Dut Interface instrument with left mouse button click and choose Save Cal from the right mouse button menu then choose OK from the Save Calibration prompt. This associates the ESN with a new Dib Cal object that points to the DIB definition (RiDibDef) created with the Device Connection Editor app.
Using Test Session Editor:
The Test Session Editor is how to configure Test Execs to run with the Cassini in Container application or the Saturn > Cassini > Test Exec user interface. View the Test Session Def User Guide (https://roos.com/docs/ECHN-CC7SHU?Open) for details.
To Edit a Test Exec (RiTestSessionDef):
- From Guru, choose Login and enter an Engineering Login (Apps button is disabled for Operators)
- Choose Apps > Test Session Editor v#
- Choose Test Session > Load... menu.
- Select the RiTestSessionDef by filtering by Device Family, sorting rows by right clicking in the selection pane and choosing Sort by and the value, and choose OK.
- Make modifications as needed. View the Test Session Def User Guide (https://roos.com/docs/ECHN-CC7SHU?Open) for details.
Known Issue Workaround: If the Testplan is changed, you must save and then open the Session Def to see the change in the Bins and Limits tab. This should be fixed in a future release. - To edit the Device pull down menu on the Exec UI, choose the Datalog tab, under the Attributes panel, choose add to create an attribute Name of "partType" with value of one or more device name for the device selection in the TestExec UI i.e. "~markTest~markProto" with the tilde "~" in front of each value. (See Figure 29) Choose edit to modify the value of the partType attribute and choose OK. (See Figure 30)
- Choose Test Session > Save... increment the version and/or change the status and choose OK to save.
- Close the Test Session Editor window and launch the Exec to evaluate the changes.
Using Cassini in Container Procedures:
- To Start Cassini in Container
- To View the Worksheet from Cassini
- To Switch between Saturn and Cassini app in Container
- To Share a testplan between Saturn and Cassini
- To Close Cassini 16 Container before Windows logoff or shutdown
The Cassini app launched from Short Cuts button requires that both the Saturn app and the Cassini in Container (VirtualBox) ArcaOS desktop. The Cassini16 container functions identical to the ArcaOS EPC with all the features of the Cassini application, as shown in Figure 33. One noticeable difference is that, the worksheet with live test results is running on the outside of the container.
To Start Cassini in Container:
- Confirm in the Saturn message window the "Tester Loaded" message appears. Saturn must be fully activated before the Cassini startup is performed.
- Choose Short Cuts button and choose the latest ACME Dev or ACME Production entry to start the Cassini 16 system software inside the container, as shown in Figure 31. If Short Cuts and User Apps button is grey, confirm "Saturn...", "Db Manager" and the ArcaOS desktop container is running. The Linux EPC includes keep alive scripts which will launch any of these required applications after a brief delay if they are manually closed or crashed. If it is not working, try restarting the OS.
- Wait for the Cassini application to finish loading the tester with the "UTC Time" message in the message window, as shown in Figure 32.
- Choose System > Execs or Test > Plans to select a target device by opening a Test Plan or launching a Test Exec.
- Note: See "To Fix Red Background of Cassini app"
- Once a testplan has compiled and Options > Worksheet > Details or Test Exec Start and View buttons pressed, a Worksheet will be opened outside of the container, often behind the container window. (see Figure 34).
- Choose the small Java icon on the Windows task bar, and select the worksheet window to raise it front the container, as shown in Figure 35. The worksheet will update after limits are applied to the DUTs test result.
To Close Cassini 16 Container before Windows logoff or shutdown:
- From within the container, choose shut Down... from the right click menu on the container desktop or choose the power switch button icon on the bottom left side of the container task bar.
- The "red background" on the Cassini application message window (see Figure 32b) indicates there is an issue connecting with Saturn app's USB RIFL java interface.
- Shutdown the Container by choosing Shut down... from the right mouse button menu when clicking on the Container's desktop.
- Start the Saturn app (or perform startup if it is already running), then double click on the Cassini 16 Container icon on the Desktop.
- If the problem persists, shut down the container and then restart Linux EPC.
To Switch Between Saturn and Cassini
IMPORTANT: Only Saturn app or Cassini app in Container should be used to control the hardware at a time. The tester should be set to the Default Idle State before using an application to control the Tester, i.e. not running a testplan. Before using Cassini, choose System > Equip > Startup > OK to will force the Instruments to their default idle state and reload cal data from Guru. When using Saturn, choose Apps > cassini, double click on equipment and choose File > startup to force the Instruments to their default idle state and reload cal data from Guru. The tester is not in an Idle state if a break point is set in the testplan open with Cassini or if a Cassini Control Panel is used to manually change an Instrument state.
Example Use: Switching to Cassini in Container allows rapid debug and correlation between identical testplans open with bot Saturn and Cassini.
If you need to switch the application and the tester is not in it's idle state, then perform a startup on from the desired running application. For example, if you run the Saturn compiled testplan to its completion, the system will return to its idle state. A Cassini in Container compiled testplan can then be run without requiring a Cassini > System > Startup interruption.
- Before using Cassini in Container:
- From Cassini window, choose System > Equip > Startup > OK before compiling and running a testplan.
- Before using Saturn :
- From the cassini app window, choose equipment > startup.
- Open a testplan, activate a limit, choose compile and then run.
- To Share a Testplan between Saturn and Cassini:
- Save changes to the testplan. (Saturn: Testplan > Save, Cassini: File > Save to Guru)
For example, modify the Testplan with Cassini app in container and then immediately open, compile, and run it on the Saturn app. - Open the Testplan (Saturn: Testplan > Open, Cassini > testplan...) on the other application..
Figure 1 - Saturn Program Directory: ~/RiApps/GuruApps/GF11RE2A
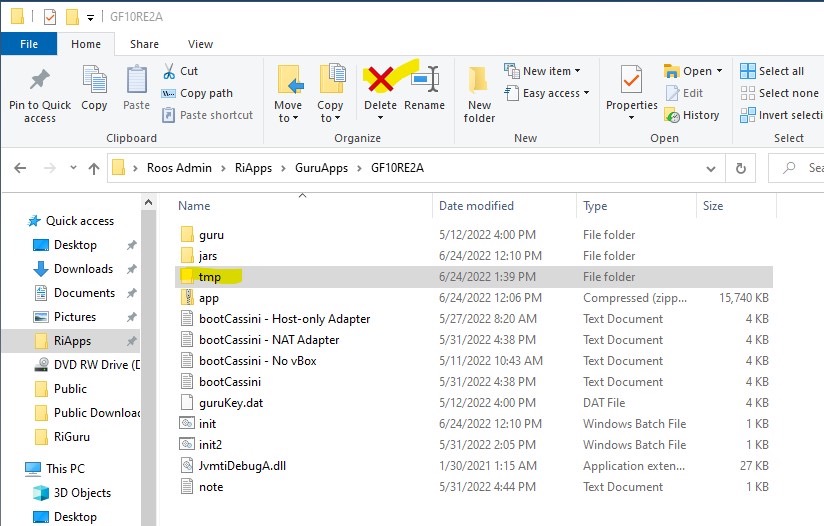
Figure 2 - Import .GZP
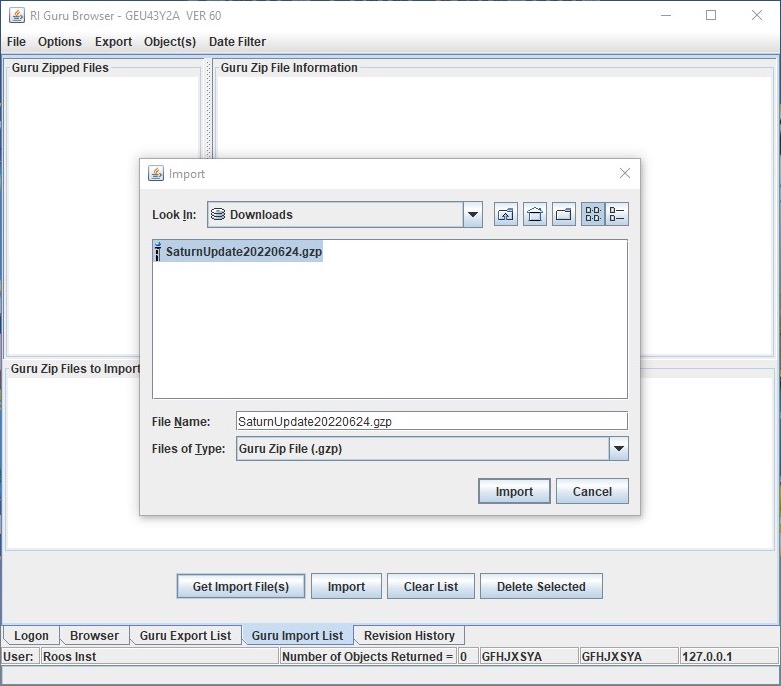
Figure 2.1 Close Saturn Application
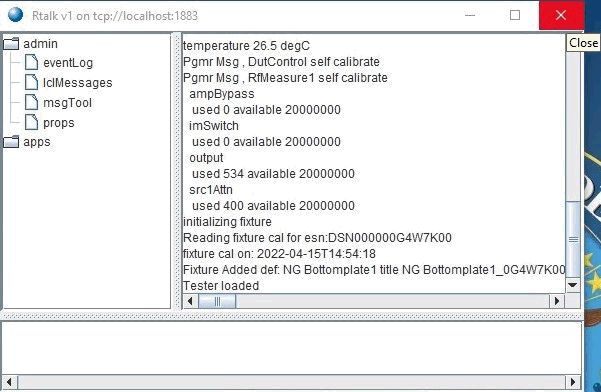
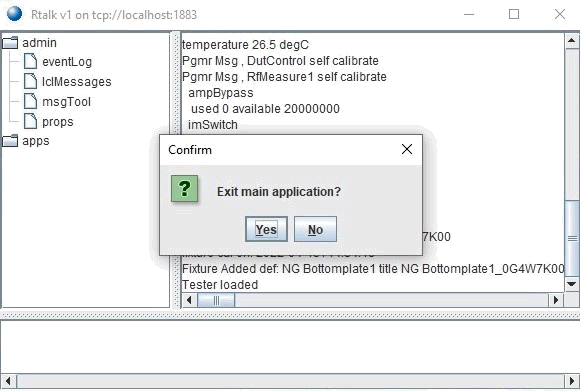
Figure 2.2 Copy Files to ~/RiApps/guruServer/ directory
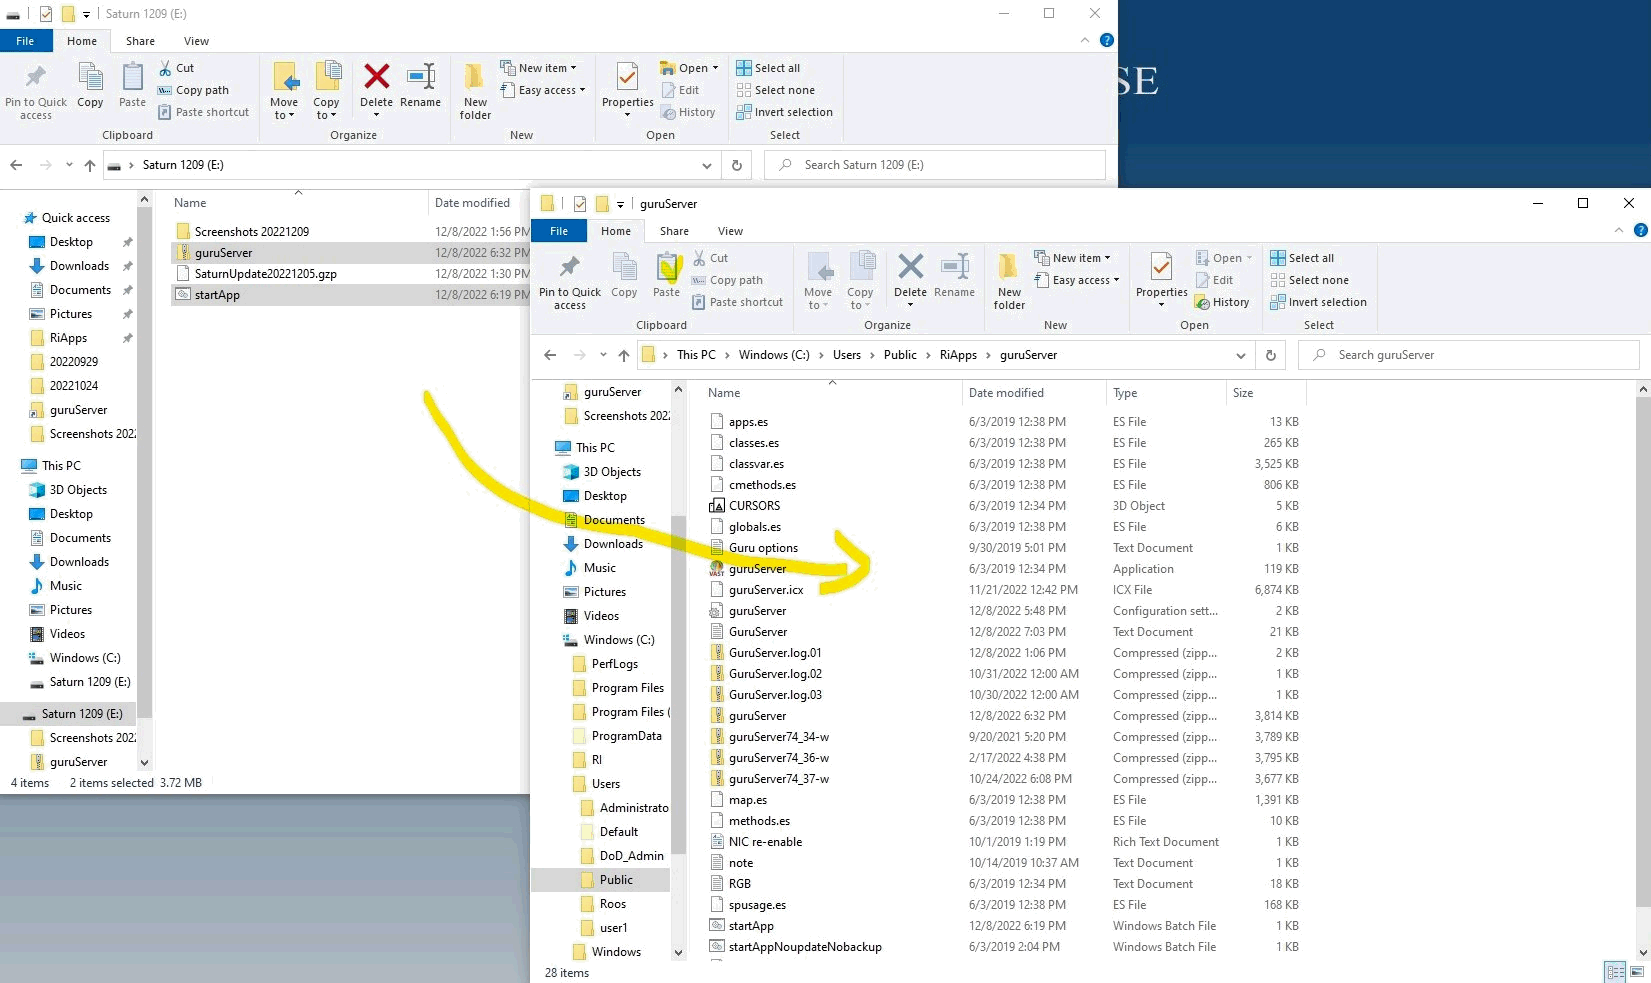
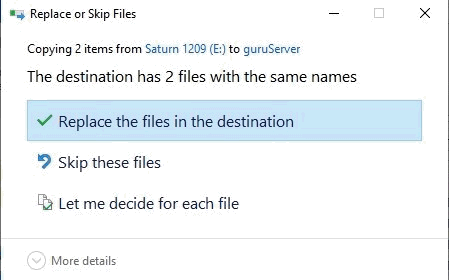
Figure 2.3 Upgrade guruServer file dates
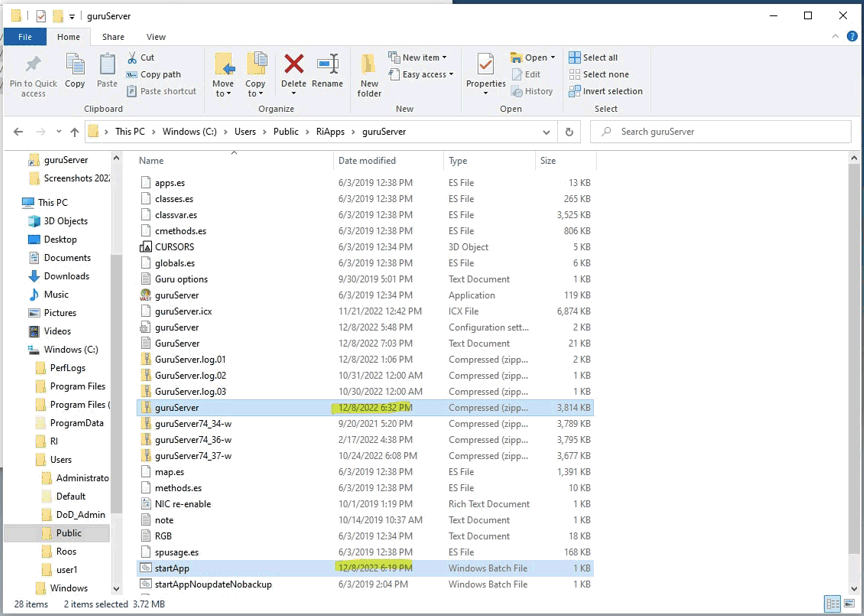
Figure 2.4 Restart LinuxOS
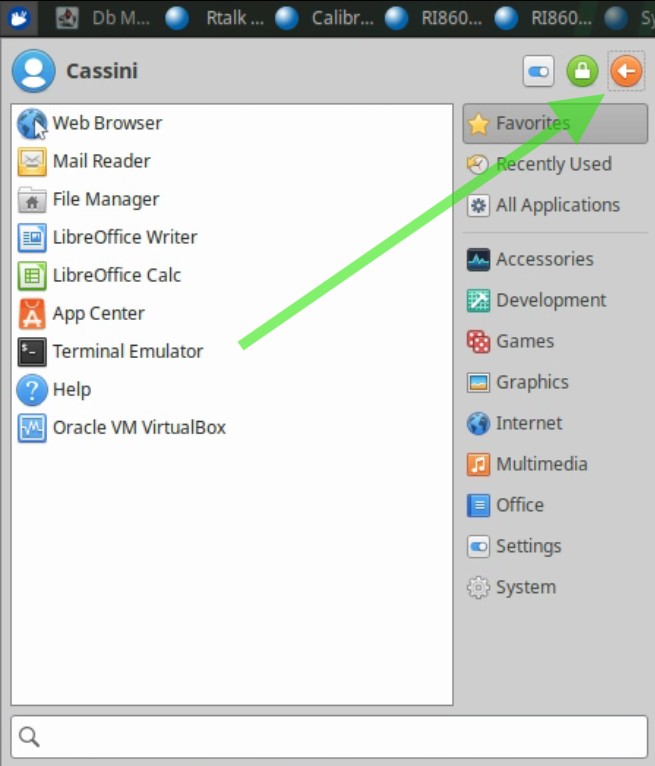
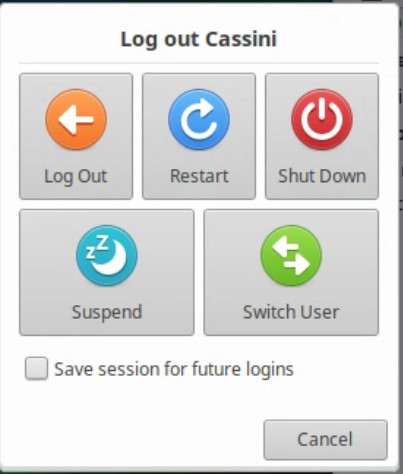
Figure 2.5 Guru Version from Taskbar
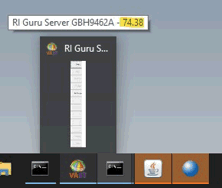
Figure 3 - Saturn Version: Guru > Apps
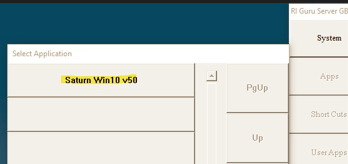
Figure 4 - Saturn: Tester Loaded (Ready)
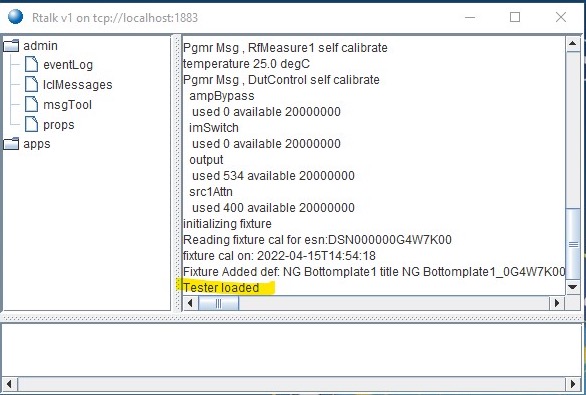
Figure 5.2.1 - Python3 version
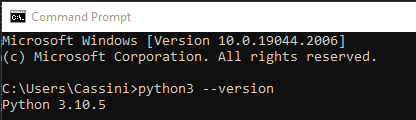

Figure 9.1 - Activate Test Exec

Figure 9.2 - Test Exec: select Exec
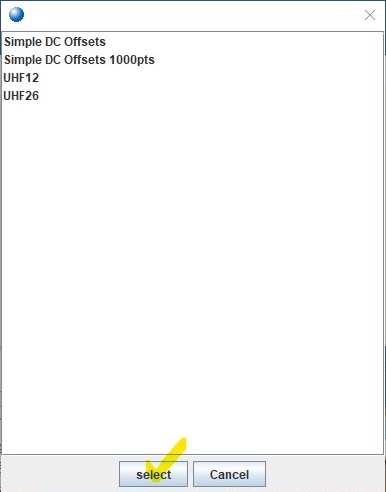
Figure 9.3 Saturn Compiles Testplan
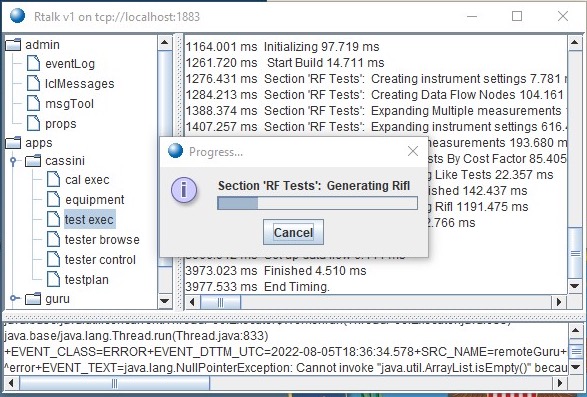
Figure 9.4 - Test Exec: Enter Lot Information (Lot, Date Code, DIB ID, Comment)
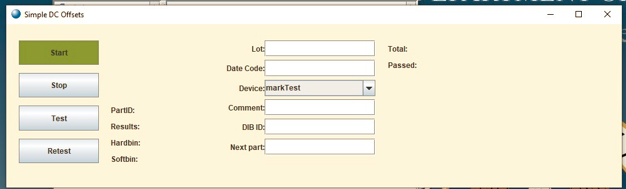
Figure 9.5 - Test Exec: Choose Device
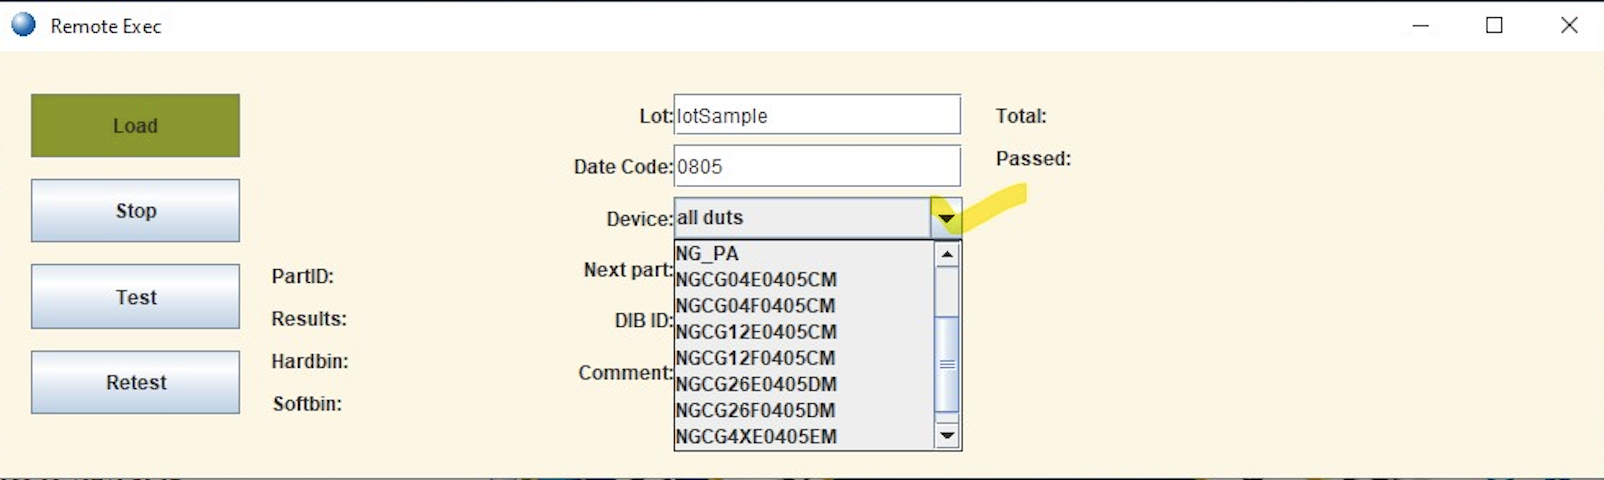
Figure 9.6 - Test Exec: Start button enabled, enter Lot Info and choose Device

Figure 9.7 - Test Exec: Next part, Test
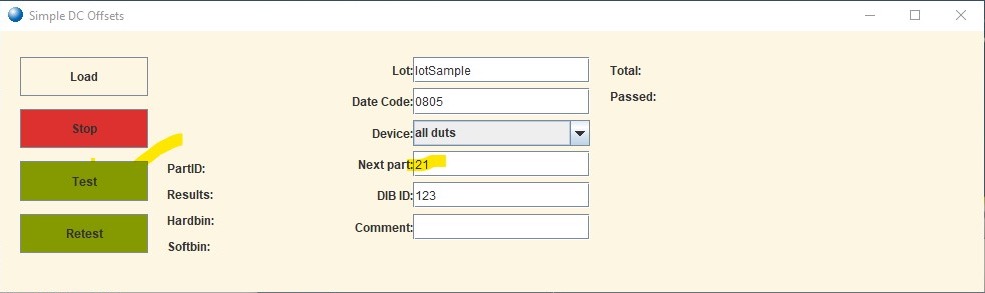
Figure 9.8 - Test Exec: Running Exec with Worksheet, PartID Results, Lot totals
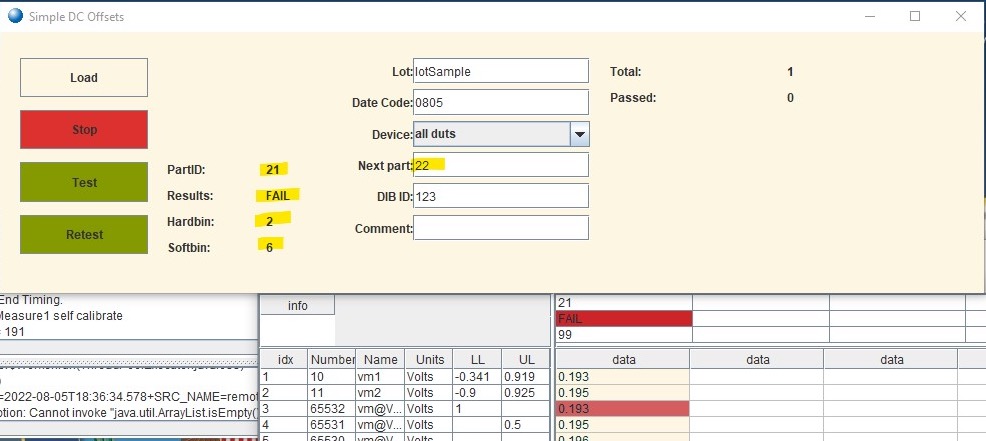
Figure 9.8 - Test Exec, Modify Next Part
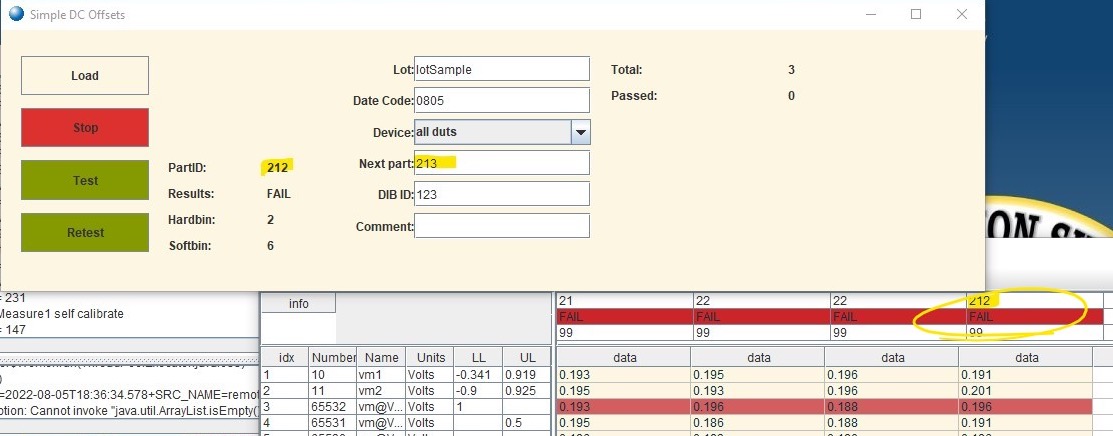
Figure 9.9 - Test Exec: Retest Example
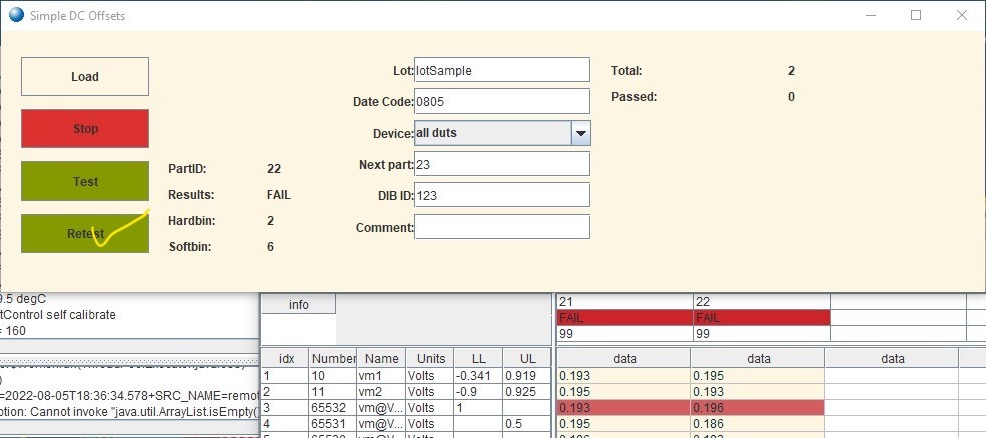
Figure 9.10 Test Exec: Retest Result
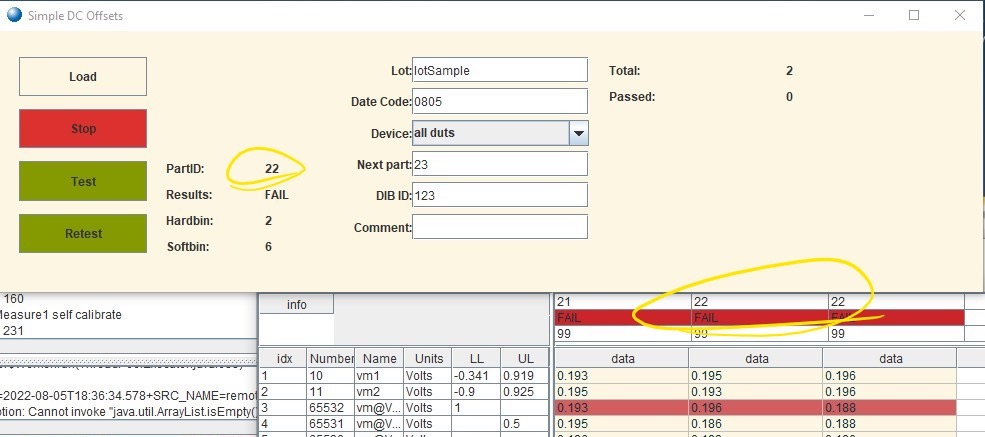
Figure 9.11 - Test Exec: Stop to End Lot
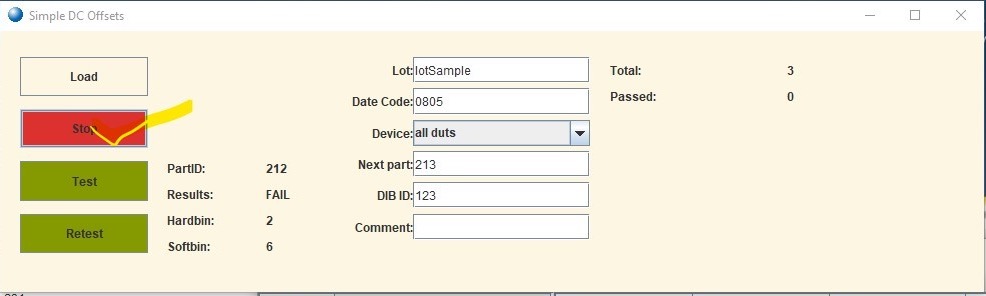
Figure 9.12 - Test Exec: STDF Output
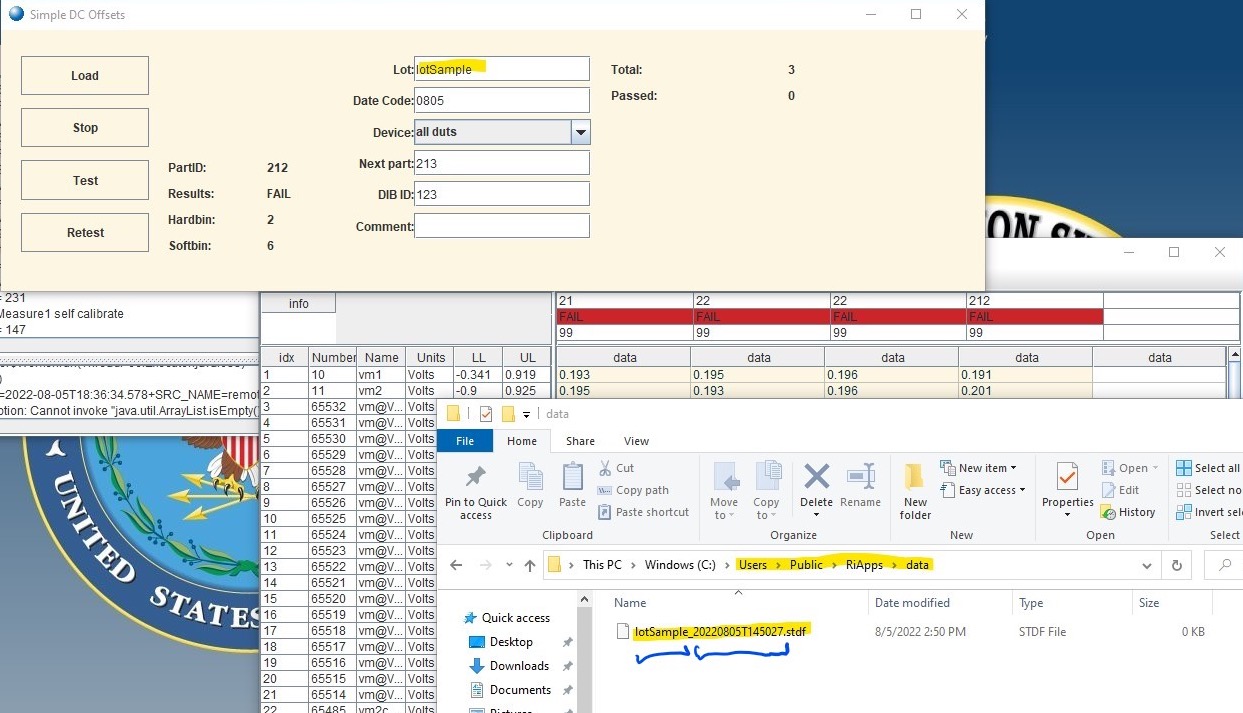
Figure 9.13 - Test Exec: Modify Output Directory
Edit "bootCassini.txt" found in ~\RiApps\GuruApps\GF10RE2A and change the value after +stdfDir= to the full path name
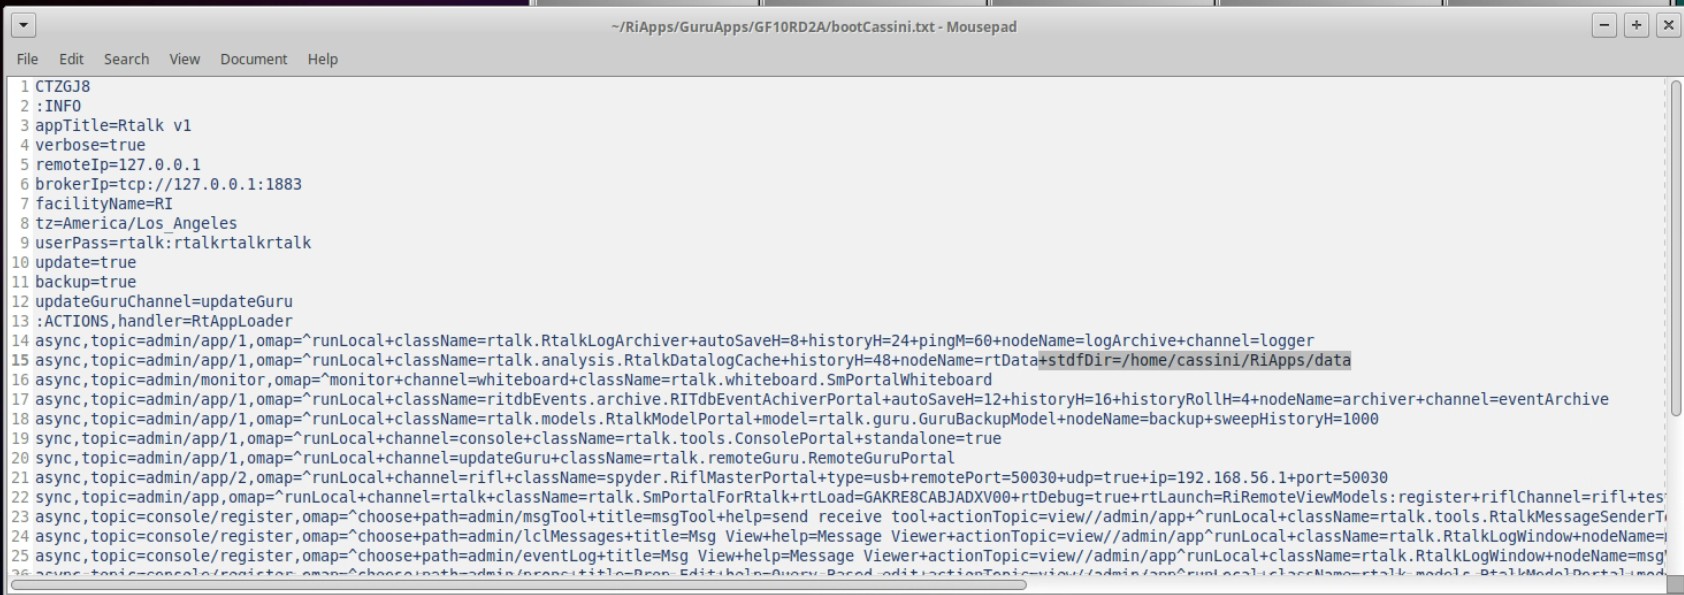
Figure 9.14 Worksheet > Data > Save Csv
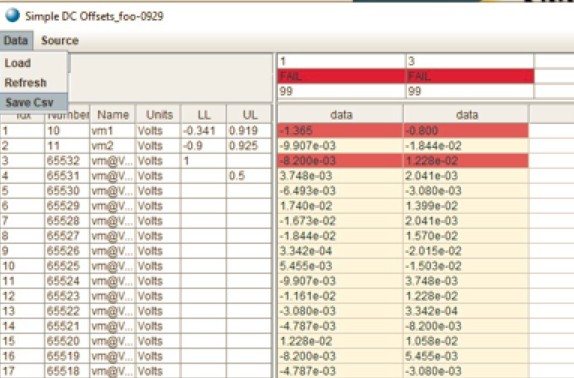
Figure 9.15 CSV saved in ~\RiApps\data directory
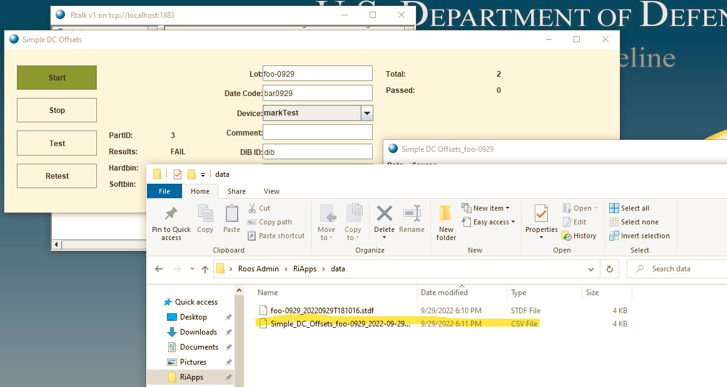
Figure 10 - Saturn: apps > cassini > testplan > load
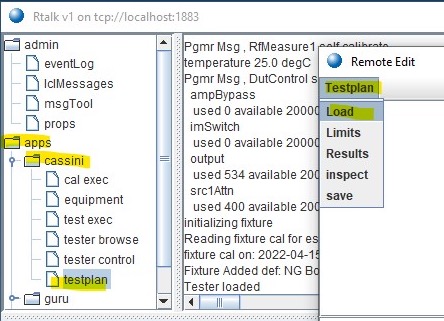
Figure 11 - Saturn: Testplan Load
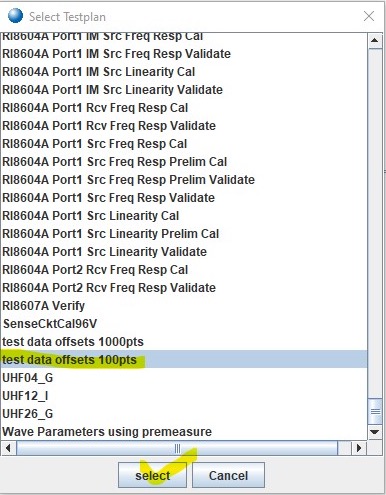
Figure 12 - Testplan > Limits
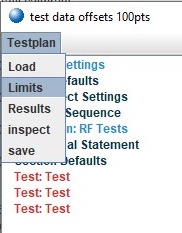
Figure 13 - Testplan > Results (Worksheet)
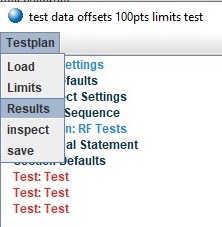
Figure 14 - Worksheet Window
Figure 15 - Testplan Ready (run)
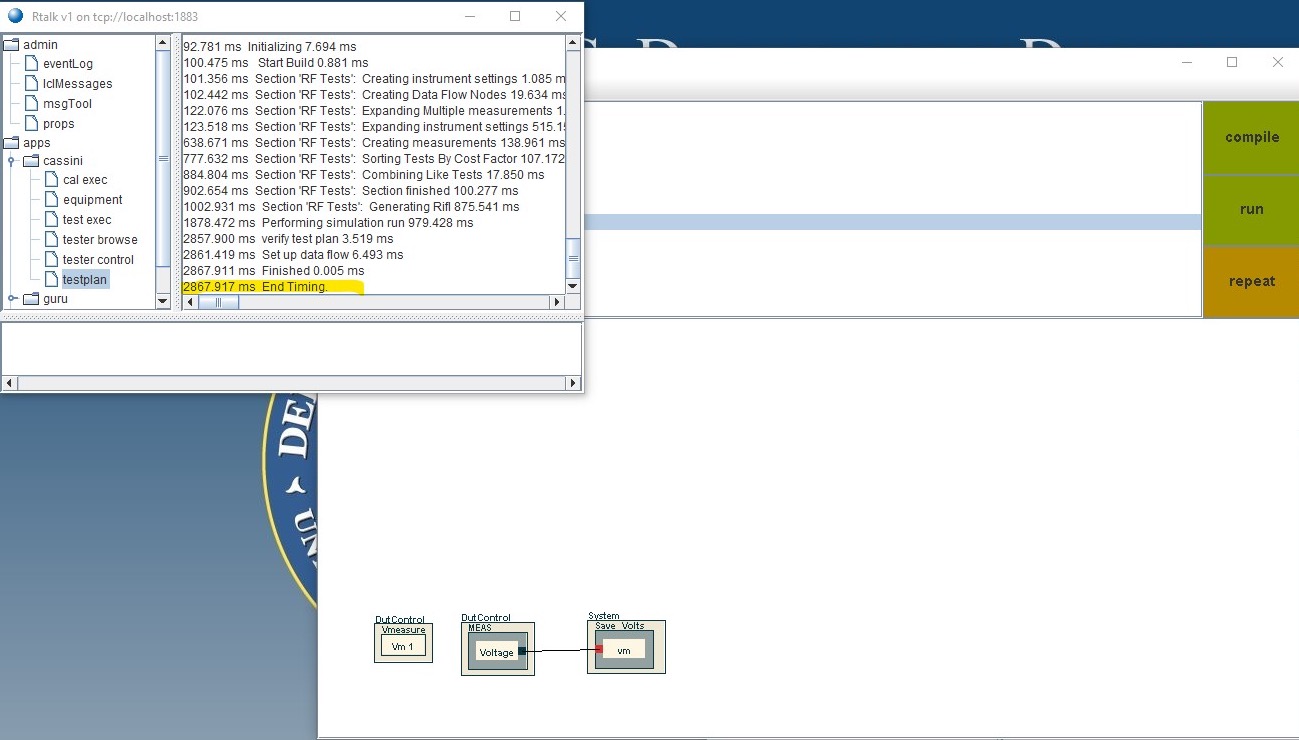
Figure 16 - Testplan Results
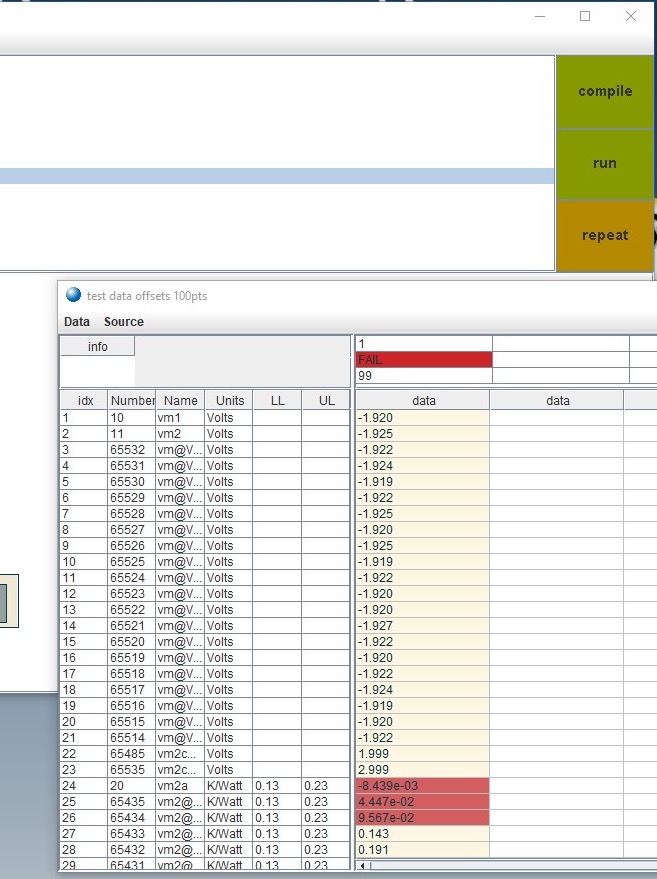
Figure 17 - change limits Right Mouse Button Menu
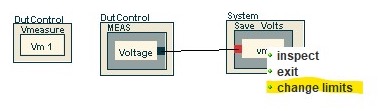
Figure 18 - Edit Limits for: vm
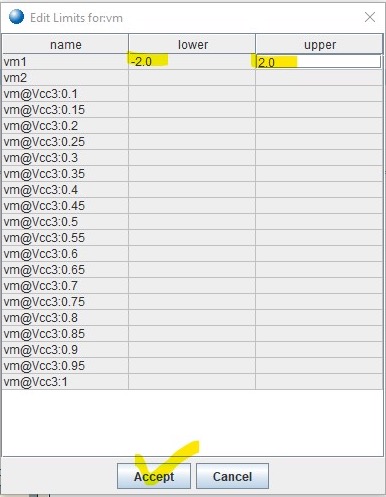
Figure 19 - compile
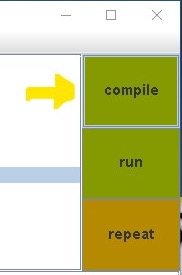
Figure 20 - Example Worksheet showing change to vm1 LL and UL
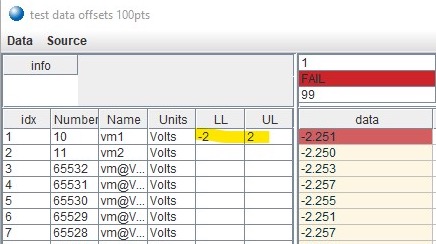
Figure 21.1 - Testplan > Copy Limits menu
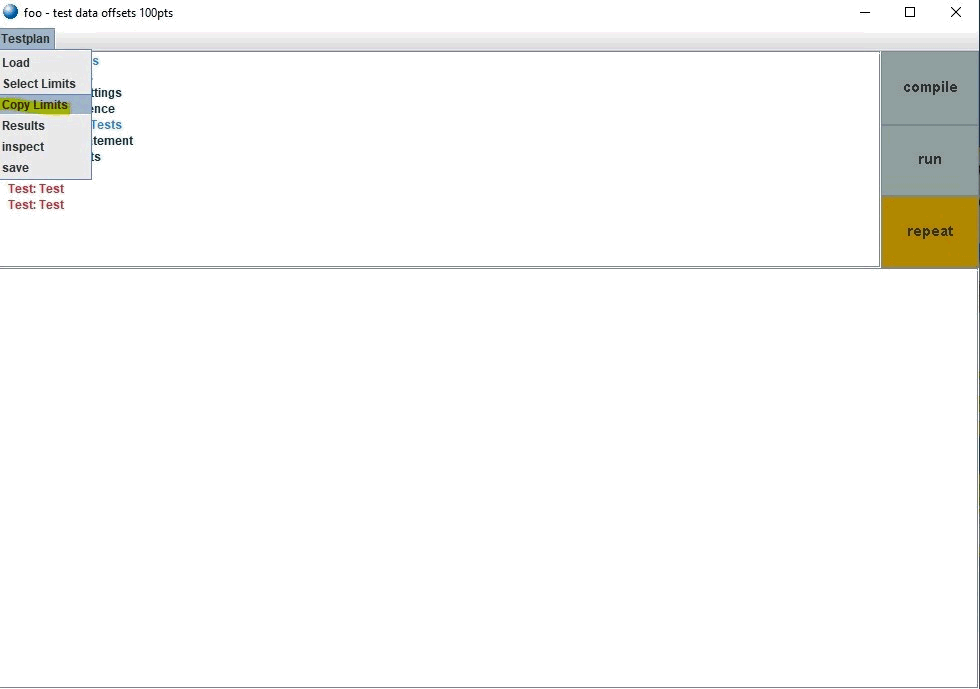
Figure 21.2 - Select Testplan dialog
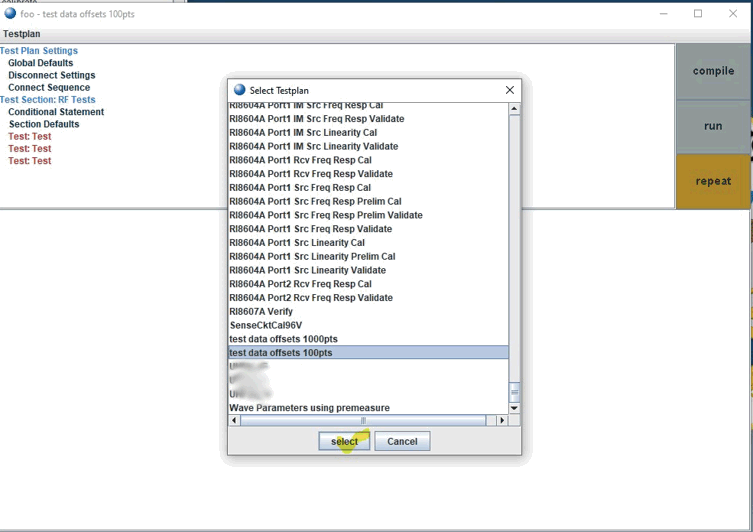
Figure 22 - RF Tests > Section Defaults
Change Vcc3 sweep from 0 to 1 volts, next click on the stop value and change it to 2.0
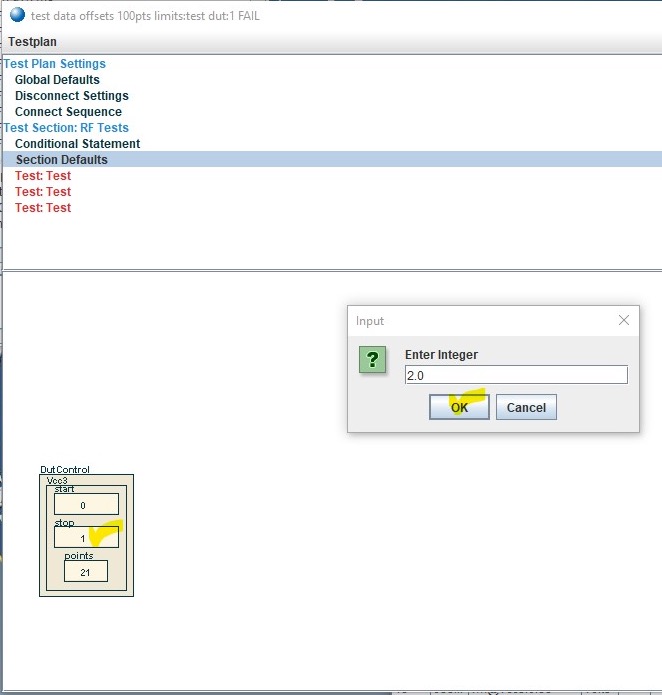
Figure 23: compile
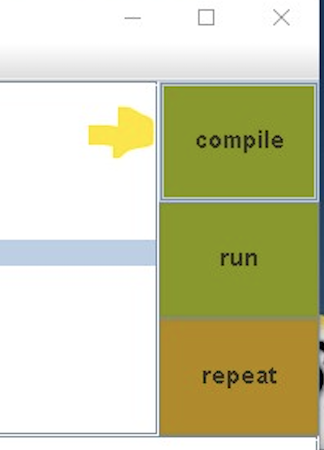
Figure 24: Worksheet with new values
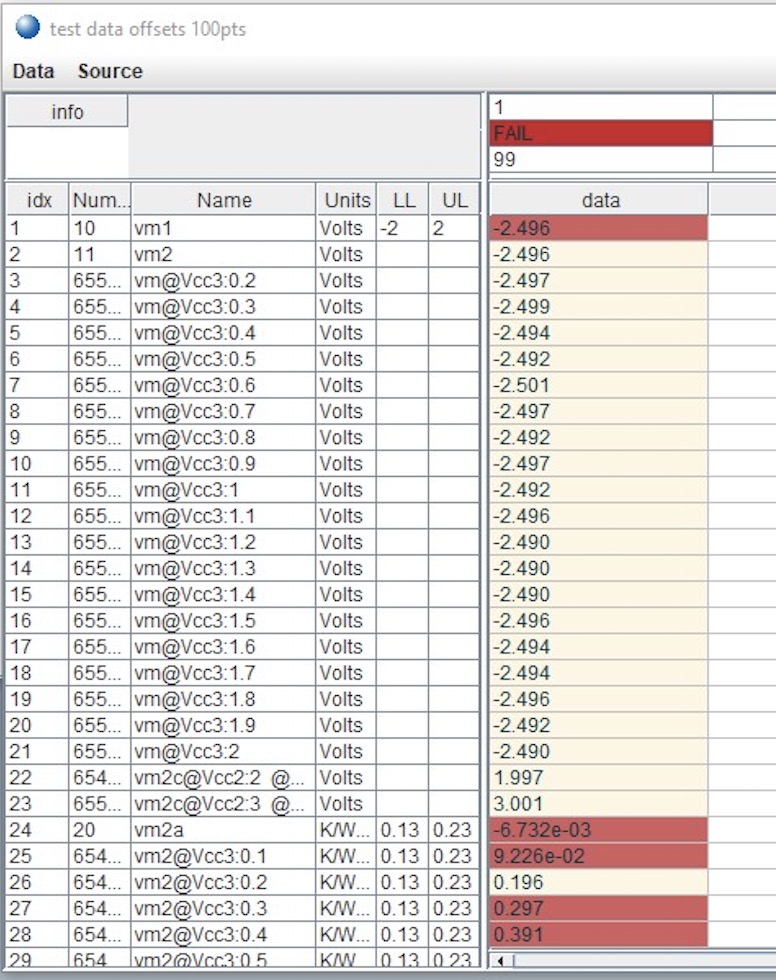
Figure 25 - Save Testplan

Figure 26 - Save Testplan Window, change Title, SaveAs
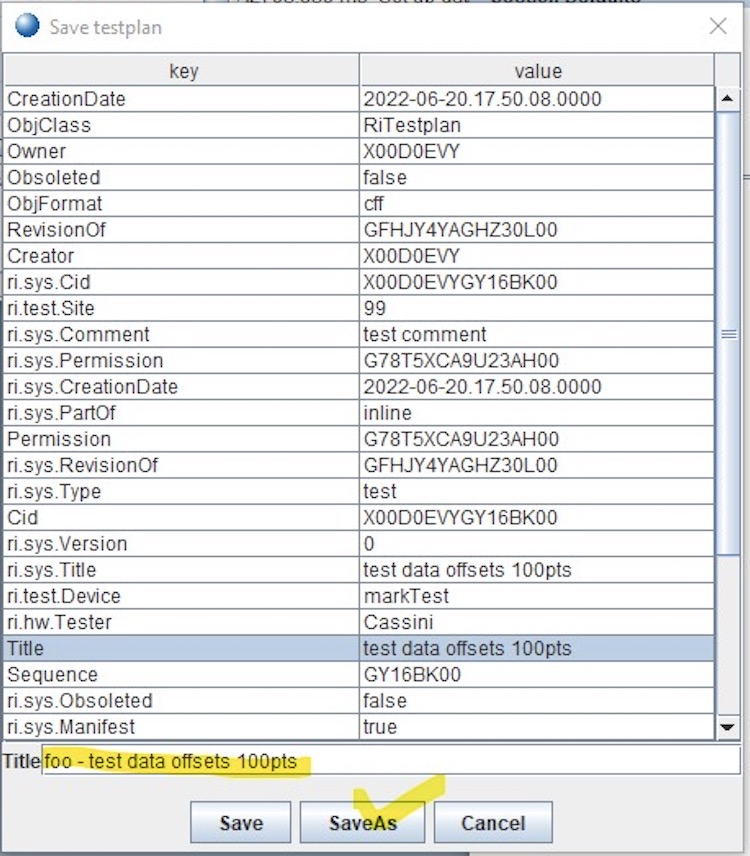
Figure 27 - Edit Value
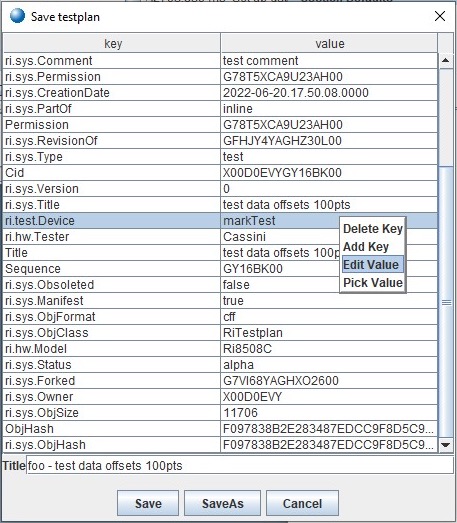
Figure 28 - Select Testplan window with the new Testplan copy
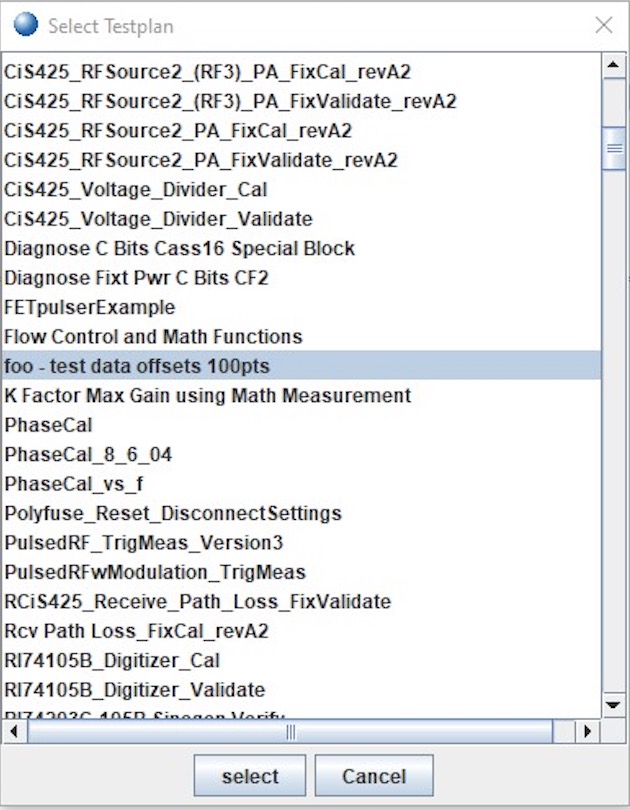
Figure 29 Test Session Editor > Datalog Attributes > Part Type
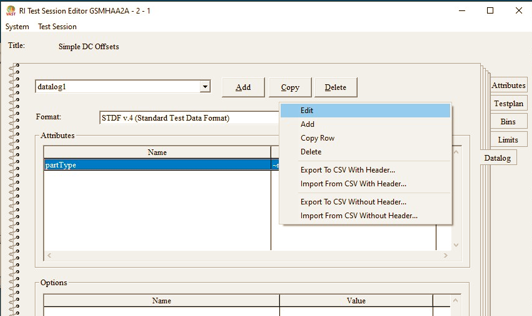
Figure 29.1 Test Session Editor > Datalog Attributes > Part Type
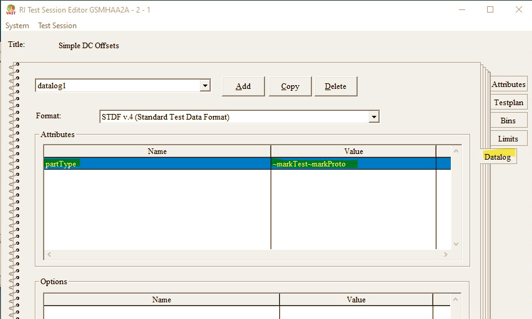
Figure 30 Editing Part Type
